
Here are some basic animation tips for beginner animators. Tips I would have loved to hear back then, when I didn’t know tips existed.
You want to start learning animation, but don’t want to be overwhelmed with tons of things you won’t need right away for every animation you make?
Start Small.
What do I mean by that? Maybe an orc with clothing, the fur of a wolf and a cape is not the best way to start, if what you want to learn first is to animate. So what do you do? Take the orc’s clothes off? Sure, you can, but then you still have to animate a face and make some advanced textures and materials.
The best things to animate when you’re starting are: robots, stick figures and insects because:
1. They don’t require any muscle deformation
2. They probably don’t need to have an animated face either, so you can focus on body mechanics the whole way.
3. You can get away with having to do texturing and programing materials.
4. You can also excuse yourself with bad animation by saying: “hey, it’s a robot” or “hey, it’ an insect”.
5. If you make them humanoid, you can find an autorig and rig them a bit faster than something more complex.
Lizards are also good, because they’re almost expressionless, except when they pull out their tongues (which you don’t have to show) or blink (which is not so much work when you’re starting) but for a reptile to look reptile-like, you need lots of scale textures and extra photoshop and painting knowledge, which you might not be interested in. The problem is that they’re mostly quadrupeds, so rigging and animating might be a problem to start, unless you take some creative license and make it a humanoid lizard, that way you can auto-rig, but you still have to take care of the muscles and volume preservation in the body. Ninjas al also good, they have their faces covered, they wear mainly black and show up mostly at night, so you can also get away with some of that.
Forget the Background for now.
Forget about your background when you’re starting as an animator. If you have to use props, do those props first. If you still want to have a background, make your camera still and make a matte painting to composit your rendered shot later, like how 2D animation is done.
Planning your shot. The best gift you can give yourself as an animator.
Using reference and planning is the easiest way to increase your animation speed. Every time you’re done with a pose, figuring out the next pose takes a lot of time and frustration if you haven’t planned your shot.
What do I mean by planning?
Let’s say you have a character that picks up a ball and throws it. If you go directly to the computer with say, no established camera angle, you’ll start making your first pose, moving, fixing, moving, correcting, then realizing that it doesn’t look good in every angle, then you move again and again untill you grow tired (instead of satisfied) of your pose, then the next one. You stand up, and do some movement from your actual pose, to your next pose, paying attention to your hips, so you go and do that in the computer, then, how was the wrist positioned again? Act it out… ok, cool, then a finger, then the knee, then you realize that your pose is no longer balanced or your character picket the ball with the wrong hand. Back to acting it out. Frustration over 9000. Instead, you can have a set of guidelines for every pose, drawn in paper or screen and when your character hits that frame, you follow your own drawing.
I know what you’re thinking. You will NOT copy frame by frame from your footage, that’s rotoscoping and yes, you might need to do that some time, but you’ll learn very little from it and it does not require great skill or follow any style. Besides, you want the animation come from you, not a copy of something else, right?
This is what you do:
1. Grab a camera and a tripod or a table or something stable.
2. choose your angle and stick to it (this is important).
3. Practice your action.
4. Record your action several times.
5. Make it clear for you, but make sure somebody else with a fresh set of eyes can also understand it. Have good lighting, don’t use the lighting you’re using in shot (example: if your character is that ninja in the middle of the night, be a ninja, but record with good lighting) use 24 frames per second, it’s easier to translate the information. If you’re gonna make an insect, a bee for example, you might find it useful to record at a higher speed, to capture more subtle movements, but that’s for later.
5. Choose one, or the best parts of several and edit them together. It’s easier to do several shots and make one great one.
6. Go to your reference footage and analyze it.
Analyze Footage:
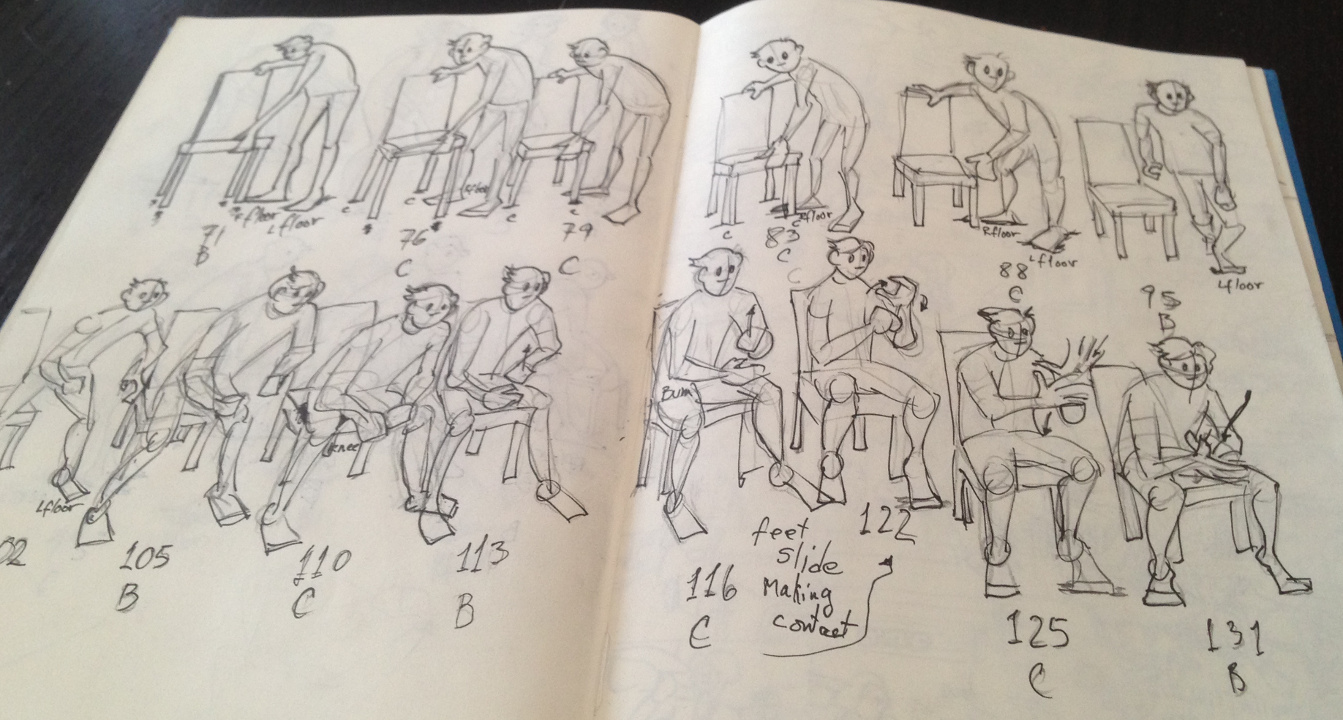
Every time a foot leaves the floor or lands on the floor, or a hand touches/leaves a table or grabs/looses an object, that’s a contact pose (can also be considered a keyframe). Also, there are breakdowns or turnaround poses. You recognize them because they’re usually frames in the middle of an action, that have the least motion blur in them. Say your character throwing the ball, after the ball gets picked, there might be a pause and then, your character puts a foot back (contact pose) then starts raising the other foot (another contact pose) and leans back while putting his ball arm back, before doing an arc (will talk about that later) and let go (contact pose), there’s a point in that arc, where that arm will be completely blurless if you made your shot at 24 frames per second with a shutter speed where motion blur can be normally seen. It will be somewhere between the keyframe where the hand charges back and where it goes forward with the throw.
The only things you start by emulating, are the contact/keyframe and breakdown/turnaround poses, but you’ll modify them as you advance in your animation.
Because:
-Yes, you are a certain body tipe, and you may require to use your weight differently than a character that is thinner, heavier, bigger or smaller than you, or if you’re a guy and your character is a girl. The timing will be different, the falling of joints will be different and at this point you just want to have your base poses on paper (or your scene).
-Yes, you are an artist, not a photocopier.
But Flan de la Casa: What if I want to make a ninja jump from a 5 story building but I’m not a 5-story-building-jumping ninja?
A: That’s what the Internet and your imagination is for. Combine movements, using all the resources you have to build the shot as you visualize it. Once you’ve studied a lot of reference (note: actual reference, not other animations or movies with visual effects) you can make things look very convincing. Remember: in film things don’t have to be real, they have to be believable.

Draw.
So you draw those contact poses and turnaround poses. You also write next to them: on what frame they happen and what they are. Putting some arrows help, to show where each limb is going, but if you want to analyze your movement further, you can also do the following. You could use your 2D software and make a stick figure animation of your character, you can do it on 2’s or even on 4’s, just to get a rough breakdown of the movement. It works like a charm. You don’t have to be extremely skilled draftsman, but you get to have a very clear idea of what you have to do before even starting. After this step, you will animate bizarrely fast.
Reveal your arcs.
In your 2D animation software, Epic Pen, Syncsketch (this is so good, I’ll talk about this in a second) or even directly on your screen with a dry-erase marker (don’t tell me I didn’t warn you), you grab one movement from one keyframe to another keyframe and take the nose of your actor and mark a point on the tip of the nose of your actor, advance 2 frames and mark that point again, and then 2 more frames and another point. You then connect the dots and voilá: you got yourself an arc. You can also do this with the wrists, hands, elbows, shoulders (this is particularly nice, the mark of a good animator is the use of the shoulders, so if you get the arcs of your shoulders, it gets noticed by seasoned animators) or the hips (wear a belt or put on some colored tape a bit below your belly button, so you can easily mark where your hips go).
Translate your poses.
Think of the body weight of your character, with a heavier character, every movement he does, will take a couple of more frames than what you did, specially if the movement is of the body going up: lifting, ascending stairs, climbing. With jumping, whether you decide to believe it or not, a feather, in a vacuum, falls at the same time as a bowling ball, so if your character leaves the floor with no support from any other object, and falls back again, he will fall with the same ammount of frames than the ones he jumped for. They will not be exactly on the same height on their respective keyframes, but it will be the same ammount, unless he’s a super hero or Wile E. Coyote.
In fact, don’t do any of this first if you haven’t done a convincing bouncing ball. Go do that bouncing ball. First make a tennis ball, then a ping pong ball, then a bowling ball, then study and compare their movements. Study balls, yes, many balls, here’s a video. Go, I’ll wait.

Fresh eyes and Critiques
Ok, you did your bouncing ball, good. You did your animation, good. You looked at it over and over for half an hour and couldn’t find anything to fix? Good. Turn off your computer and go to sleep. Wake up. Turn on your computer and watch it again. You’re likely to find something you did not notice before, or something you don’t like how it came out. Animate some more until you don’t see that thing you don’t like and call a friend (or an enemy, or a total stranger)
Get other people to look at your sequences: fresh eyes, even fresher than your own. Your mom is the worst possible candidate for this. She will miss the point because she loves you. Look for someone who you admire, someone you know will tell you the truth and/or someone who you know they know what they’re talking about, or one of each. Total strangers also work, because they’re unbiased. Speaking of total strangers, Syncsketch is a website that lets you upload your animation and lets others watch it and critique it, with annotations on each frame, colored drawing on your sequence and everything. Critiques are the most brutal and most efficient way to learn. Doing critiques also helps, because you notice, for example, mistakes in other’s animations that you didn’t realize you were doing in yours. That is, of course, if you’re humble enough to admit that you commit mistakes. Oh yes, by the way:
Be humble.
Nothing gets on the way of your learning more, than being arrogant and thinking that you know everything. If you do this in front of others, not only you don’t gain anything, you get to loose people to collaborate with.
Demo
Once you’re satisfied with your sequence, put it in a demo reel. You don’t need to render it and look all pretty if you’re applying to animation studios. If you’re a freelance animator, and your audience are potential clients, they will not understand why your playblast doesn’t look pretty, and you don’t want to be explaining when you want to be dazzling. So if you’re freelance: add textures (before you rig, please UV map) , add materials, lights, depth of field, motion blur and render, composit it on your background, then include it on your demo reel.
If you have any basic animation tips, I would love to hear them. I hope these tips help.
/
Estos son algunos consejos básicos de animación para animadores principiantes. Consejos que m hubiera encantado escuchar en ese entonces, cuando yo no sabía existían consejos.
¿Quieres empezar a aprender animación, pero no quieres ser abrumado con toneladas de cosas que no se necesitan de inmediato para cada animación que hagas?
Comienza con algo pequeño.
¿Qué quiero decir con esto? Tal vez un orco con la ropa, las pieles de un lobo y una capa no es la mejor manera de empezar, si lo que quieres es aprender primero a animar. Así que, ¿qué hacer? Quitarle la ropa al orco? Claro, puedes, pero entonces todavía tienes que animar una cara y hacer algunas texturas y materiales avanzados.
Las mejores cosas para animar cuando estás empezando son: robots, figuras de palitos e insectos, debido a que:
1. No requieren ninguna deformación muscular.
2. Es probable que no necesiten tener una cara animada, ya sea, para que pueda centrarse en la mecánica del cuerpo durante todo el camino.
3. Puedes lograr bastante no teniendo que texturizar mucho ni programar materiales.
4. También puedes excusarte con mala animación diciendo: “bueno, es un robot” o “hey, es un insecto”.
5. Silos haces humanoides, puedes encontrar un autorig y hacer el skin un poco más rápido que algo que fuese más complejo.
Lagartijas también son buenos, porque son casi inexpresivas, excepto cuando sacan sus lenguas (las cuales no tienes que mostrar) o parpadear (que no es tanto trabajo cuando estás empezando) pero para que un reptil que se vea como reptil, necesitas necesitas una gran cantidad de texturas de escala y photoshop adicional y conocimientos de pintura, que es posible que no estés interesado en adquirirlos en estos momentos. El problema es que la mayoría se mueven cuadrúpedamente, por lo que los rigs y la animación pueden ser un problema para iniciar, a menos que tomes un poco de licencia creativa y convertirla en un lagarto humanoide, de esa manera se puede hacer el auto-rig, pero todavía tienes que tener cuidado de los músculos y la conservación de volumen en el cuerpo. Ninjas tambien sirven, tienen el rostro cubierto, usan principalmente negro y aparecen sobre todo en la noche, por lo que también puedes salirte con la tuya por ahí.
Olvida el fondo por ahora.
Olvídate del fondo cuando estás empezando como animador. Si tienes que usar accesorios, haz esos accesorios primero. Una mesa, una silla por ejemplo. Si todavía deseas tener un fondo, haz tu cámara quieta y haz un matte painting para treparle tu render más tarde, al igual que la forma que en la animación 2D.
La planificación de tu toma. El mejor regalo que un animador puede darse a sí mismo.
El uso de referencia y planificación es la forma más fácil de aumentar la velocidad con la que se anima. Cada vez que hayas terminado con una pose, averiguar la siguiente pose toma mucho tiempo y frustración si no has planeado tu toma.
¿Qué quiero decir con la planificación?
Digamos que tienes un personaje que recoge una pelota y la lanza. Si vas directamente al ordenador, digamos, sin ángulo de la cámara establecida, vas a empezar a hacer la primera pose, moviendo, arreglando, moviendo, corrigiendo, para luego darte cuenta que no se ve bien en todos los ángulos, a continuación, sigues moviendo una y otra vez hasta que quedas cansado (en vez de satisfecho) de tu pose, luego la siguiente. Te pones de pie, y haces algún movimiento de una pose a su próxima pose, prestando atención a las caderas, así que haces eso en la computadora, entonces, ¿cómo es que era la muñeca? Lo actúas nuevamente … ok, bien, luego un dedo, luego la rodilla, luego te das cuenta de que tu pose ya no está balanceada o tu personaje toma la pelota con la mano equivocada. Volver a actuarlo. La frustración arriba de 9000. En vez puedes tener un conjunto de guías para cada pose, dibujadas en papel o en la pantalla y cuando su personaje llega a ese cuadro, tú sigues tu propio dibujo.
Sé lo que estás pensando. NO vas a copiar cuadro por cuadro de tu pietaje, eso rotoscopia y sí, puede que tengas que hacerlo que en algún momento, pero podrás aprender muy poco de ello y no requiere de una gran habilidad de animación o seguir algún estilo. Además, tú quieres que la animación venga de tí, no que sea una copia de otra cosa, ¿verdad?
Esto es lo que haces:
1. Toma una cámara y un trípode o una mesa o algo estable.
2. Elige el ángulo y te mantienes fiel al mismo (esto es importante)
3. Practica tu acción.
4. Graba tu acción varias veces.
5. Hazlo claro para tí, pero asegúrate de que otra persona con los ojos más frescos, también pueda entenderlo. Ten una buena iluminación, no utilices la iluminación que se está usando en la toma (ejemplo: si tu personaje es un ninja en el medio de la noche, sé un ninja, pero graba con buena iluminación) utiliza 24 fotogramas por segundo, es más fácil para traducir la información. Si vas a hacer un insecto: una abeja, por ejemplo, sirve que la filmes en más cuadros por segundo, para capturar movimientos más sutiles, pero eso es para luego.
5. Elija una toma, o las mejores partes de varias tomas y editalas juntos. Es más fácil hacer varias tomas y escoger una muy buena.
6. Ve a tu material de referencia y analízalo.
Analiza el Pietaje:
Cada vez que un pie deja el suelo o aterriza en el suelo, o una mano toca/deja una mesa o atrapa/suelta un objeto, eso es una pose de contacto (también se puede considerar un keyframe). También, hay breakdowns o poses de giro. Puedes reconocerlos porque son cuadros generalmente en medio de una acción, que tienen la menor cantidad de motion blur. Digamos que tu personaje está lanzando la pelota, después de que recogió la pelota, podría haber una pausa y luego, tu personaje mueve un pie hacia atrás (pose de contacto) luego comienza a levantar el otro pie (otra pose de contacto) y se inclina hacia atrás mientras lleva su mano con la pelota hacia atrás, antes de hacer un arco (hablaré de esto más adelante) y dejar ir (pose de contacto), hay un punto en ese arco, donde ese brazo será completamente sin blur si hiciste tu toma a 24 cuadros por segundo con una velocidad de obturación en la que normalmente se vería algo de blur. Será en algún lugar entre el keyframe donde la mano recarga hacia atrás y en donde va hacia adelante.
Las únicas cosas que vas a empezar emulando, son las poses de contacto / keyframe y las breakdown/poses de giro, pero tú vas a modificarlas a medida que avanzas en tu animación.
Porque:
-Sí, tú tienes cierto tipo de cuerpo, es posible que necesites utilizar tu peso de manera diferente a un personaje que es más delgado, más pesado, más grande o más pequeño que tú, o si tú eres hombre y tu personaje es una mujer. El ritmo será diferente, la caída de las coyunturas será diferente y en este momento lo que deseas es tener tu base planteada en papel (o la escena).
-Sí, eres un artista, no una fotocopiadora.
Pero Flan de la Casa: qué ocurre si quiero hacer que el ninja salte de un edificio de 5 pisos pero yo no soy un ninja que salta edificios de 5 pisos?
R: Para eso está en internet y tu imaginación. Combina movimientos, usa todos los recursos que tengas para armar la toma como te la imaginas. Una vez que hayas estudiado mucha referencia (ojo, referencia real, no de otras animaciones o películas con efectos visuales) podrás hacer las cosas verse muy convincentes.
Recuerda: en cine, las cosas no deben verse reales, solo creíbles.
Dibuja.
Así que dibujas esas poses de contacto y de giro. También escribe al lado de ellas: en qué cuadro ocurren (muy importante) y qué son las poses. Pones algunas flechas ayuda, para mostrar donde cada miembro irá, pero si deseas analizar más el movimiento, también puedes hacer lo siguiente. Puedes utilizar tu software de 2D y hacer una animación de figura de palitos de tu personaje, puedes hacerlo en 2’s o en 4’s, sólo para obtener un desglose aproximado del movimiento. Funciona maravillosamente. No tienes que ser muy hábil dibujante, pero llegas a tener una idea muy clara de lo que tienes que hacer antes de empezar. Después de este paso, vas a animar bizarramente rápido.
Revela tus arcos.
En su software de animación 2D, Epic Pen, Syncsketch (esto buenísimo, voy a hablar sobre esto en un segundo) o incluso directamente en la pantalla con un marcador de borrado en seco (no me digas que no te lo advertí), tomas un movimiento de un keyframe a otro keyframe, tomas la nariz de tu actor y marcas un punto en la punta de la nariz de tu actor, avanzas 2 fotogramas y marcas ese punto de nuevo, luego 2 cuadros más y otro punto y así. Luego conecta los puntos y listo: tienes un arco. También puedes hacer esto con las muñecas, las manos, los codos, los hombros (esto es particularmente agradable, la marca de un buen animador es el uso de los hombros, así que si tienes los arcos de sus hombros, se nota por los animadores experimentados) o las caderas (ponte un cinturón o pon un un pedazo de cinta de color un poco por debajo del ombligo, por lo que puedes marcar fácilmente donde las caderas van).
Traduce tus poses.
Piensa en el peso corporal de tu personaje y compáralo con un personaje más pesado, cada movimiento que hace, va a tomar un par de más cuadros más de lo que tú hiciste, especialmente si el movimiento es del cuerpo subiendo: cargando algo, subiendo escaleras, trepando. Con el salto, si decides creerme o no, una pluma, en el vacío, cae al mismo tiempo que una bola de bolos, así que si tu personaje se separa del suelo, sin el apoyo de ningún otro objeto, y vuelve a caer de nuevo, caerá con la misma cantidad de fotogramas que con los que tomó vuelo. No van a ser exactamente a la misma altura en sus respectivos cuadros, pero será la misma cantidad, a menos que el personajes es un súper héroe o Wile E. Coyote.
De hecho, no hagas nada de esto en primer lugar si no has hecho una pelota que rebota convincente. Ve a hacer que la pelota, haz una de tennis, luego una de ping pong, luego una de bolos, estudia y compara sus movimientos. Estudia bolas, sí, muchas. Aquí hay un video. Ve, yo espero.

Ojos frescos y críticas.
Ok, ya hiciste tu pelota que rebota, bien. Hiciste tu animación, bien. La viste una y otra vez durante media hora y no podías encontrar nada para arreglarle? Bien. Apaga la computadora y ve a dormir. Despierta. Enciende el la computadora y mira la secuencia de nuevo. Es probable que vas a encontrar algo que no te diste cuenta antes, o algo que no te gusta la forma con la que salió. Animar un poco más hasta que no exista aquello que no te gusta y llama a un amigo (o un enemigo, o un total desconocido).
Consegue que otras personas miren tus secuencias: ojos frescos, incluso más frescos que los tuyos. Tu mamá es el peor candidato posible para esto. Ella perderá el objetivo, porque ella te ama. Busca a alguien que admires, alguien sabes que te dirá la verdad y/o alguien que sabes que sabe lo que está hablando, o uno de cada uno. Extraños totales también funcionan, porque son imparciales. Hablando de extraños, Syncsketch es un sitio web que te permite subir tu animación y permite que otros la miren y critiquen, con anotaciones sobre cada cuadro de tu secuencia, con colores y todo. Críticas son la forma más feroz y más eficiente de aprender. Hacer críticas también ayuda, porque te das cuenta, por ejemplo, errores en las animaciones de otros que no te diste cuenta que estabas haciendo en la tuya, claro, si eres lo suficientemente humilde para admitir que cometes errores. Ah sí, por cierto.
Sé Humilde.
Nada es obstáculo mayor en el camino de tu aprendizaje, que ser arrogante y pensar que sabes todo. Si haces esto en frente de otros, no solo no ganas nada, sino que pierdes gente con quien puedes colaborar.
Demo.
Una vez que estés satisfecho con su secuencia, la incluyes en tu demo reel. No es necesario hacerle render si vas a aplicar a estudios de animación. Si eres un animador freelance, y tu público son clientes potenciales, no van a entender por qué la prueba de la animación no se ve bonita, tú no quieres estar explicando mientras lo que realmente quieres es impresionar. Así que si eres freelance: añade texturas (antes del rig, por favor haz el mapa de UVs), agrega materiales, luces, profundidad de campo, motion blur, haz el render, trépalo sobre el fondo, entonces inclúyelo sobre tu demo reel.
Si tienes algun consejo básico de animación, me encantaría escucharlos. Espero estos tips te hayan servido.
Tags: 3D animation, animation, arcs, breakdowns, contact pose, creative, critiques, demo reel, keyframes, planning, reference, tips, tricks, turnaround pose

Comment