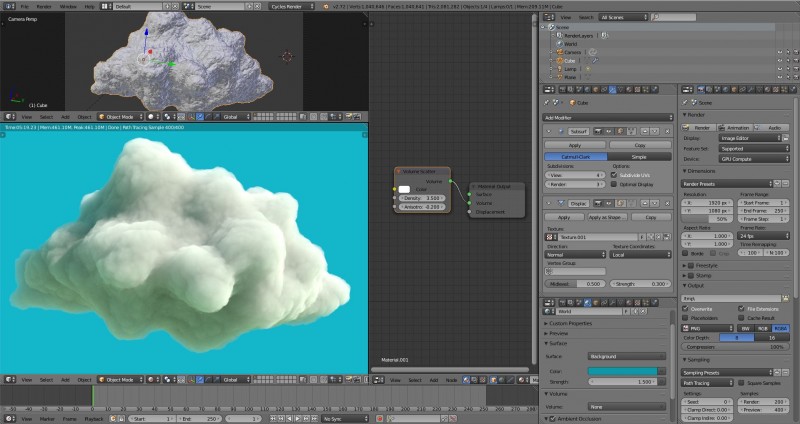
So since the new Blender 2.72 release candidate is out and since there’s a a lot of enthusiasm on Cycles’s new ability to render volumetrics and subsurface scattering on GPU, I dediced I wanted to show you how to make the easiest 3D cloud you’ll ever make in any software, probably ever.
1. Make a box. Scratch that, don’t do anything, Blender starts with a box.
2a. Select box, press Tab, subdivide 4 times. Select all vertices. Press w, o, w, o, w and o a couple of times, it will get round-ish.
2b. Optional: Sculpt your box with dynamic topology.
3. Add subdivision modifier. Make 4 subdivisions. Add displace modifier, go to texture properties, + new, leave it at clouds.
4. Switch to Cycles Render. Open nodes. Create new material. Add Volume Scatter shader, plug it to volume in material output. (this is important, if you don’t put it in volume, it will not show)
5. Render with GPU.
6. Play around with the displace settings, the cloud texture settings, the volume scatter color, density, anisotropy, lighting, the base shape of your cloud, multiply and overlap your clouds. Even animate your cloud with a rig or shape keys or both.
7. You’re welcome.
If anybody knows how to animate the cloud texture in Blender, please let me know in the comments below, I’m interested in knowing how it’s done in Blender.
Como salió el nuevo Blender 2.72 release candidate y como hay bastante entusiasmo por la nueva habilidad de Cycles, de renderear volumetrics y subsurface scattering con el GPU, decidí que quería mostrarte como hacer la nube 3D más fácil que pudieses hacer en cualquier software.
1. Haz un cubo. Olvida eso, no hagas nada. Blender empieza con un cubo.
2a. Selecciona el cubo, aprieta tab, subdivide 4 veces. Selecciona todos los vertices y aprieta w, o, w, o, w y o un par de veces, se volverá semi-redondo.
2b. Opcional: Esculpe tu cubo con dynamic topology.
3. Agrega subdivision modifier. Haz 4 subdivisiones. Agrega un modificador de displace, ve a las propiedades, + new, déjalo en clouds.
4. Cambia a Cycles Render. Abre nodes. Crea nuevo material. Agrégale un Volume shader y conéctalo a volume en el material output. (esto es importante, si no lo pones en volume, no va a aparecer)
5. Dale Render con GPU.
6. Juega con los ajustes de displace, de la textura del cloud, del color del scatter, density, anisotropy, tus luces y la forma de la nube, multiplica y modifica tus nubes. Hasta anima tu nube con un rig y un shape key o los dos, también puedes animar.
7. De nada.
Si alguien conoce una manera de animar la textura de la nube, por favor avise en los comments, me interesa saber cómo se hace en Blender.
Tags: 3D, blender, Blender 2.72, cloud, cycles, displacement, GPU rendering, nodes, nube, render, subdivision, tutorial, volumetric


Comment