
Planning Should be an animation principle. There, I said it.
One thing that has doubled my animation production capabilites and has taken my performances out of doubt and injected fun to the whole mix, is learning how to do proper planning. I say it must be an animation principle, because it’s the phase of animation where you make sure that all the principles are being applied.
So what does planning entail?
It always involves reference and thumbnailing. You can also include an X-sheet and put it in an Excel document, but you could also just put the frame number under your poses in the thumbnails.
Reference: video, with or without audio, depending on your shot. It can be you recording yourself, you recording a friend or simply finding that cute elephant taking a bath clip you saw on youtube, because, unfortunately, you don’t have elephants in your house or your local zoo. Work with what you’ve got. Here’s a good website with tons of animal videos:
http://www.arkive.org/
Also, for body mechanics, just google: parkour. You’ll either find something good for reference, or stay looking at all the videos. You’re welcome / Sorry.
If it’s acting: grab your camera or cellphone and record a long clip where you do about 10 performances listening to your audio clip. To me, it works better if you say your lines out loud. Your body language changes significantly if you force it to take air and say the lines instead of just moving your lips.
When you have your video recorded and in your computer:
Edit: grab your best-est-est-est performance. The one where you blinked at the right time, where you reacted at the right moment, where you made that cool hand gesture and stepped forward in that clear arc and your body seemed to squeeze and then extend. See? you’re already applying the principles. When you have a good performance, you already have most of the timing and some of the spacing right, you’ll be able to adjust the timing when you’re blocking and change it a bit more when you have everything splined, but in the spacing is where brain of the trained, seasoned, skilled and creative animator kicks in, but that’s at the thumbnailing stage.

Depending on how you record yourself, your characters will change angles, so it’s best if you act everything according to the camera angle that you’re gonna use. So this could be a good moment to decide your camera angle, the second best moment is when you’re thumbnailing, because there and then, there’s a possibility you might want decide to go back here. After that, what ever big change you do to your camera angle, will get away from your planning. Your drawing must be focused on your body language, so if your shot is a close-up, recording yourself full-body, might not be that useful. A shot that shows down to the hips will do, and thumbnails as well, but keep the hips in mind and in shot, to be aware of the balance of your character. A shot that is more full body, will require to show the feet, that way you don’t have to guess where the foot starts leaving the floor or starts twisting in order to sit down on that chair that is in an angle.
You might have the better parts of the performance done on take 2, but there probably will be a piece of the performance that looks better for the end on take 7, so you take both and make them fit at the pose where they look alike most. Make sure you’re not elongating or shrinking your audio clip. Keep things in the timeline, only make the performance transfer from one performance to the other as seamlessly as possible.
Observe:
If you open it on Quicktime, you can go to the timeline and see it by time or by frame number. That’s right, you put frame number and there you have it. Check for these types of keyframes: 1. Storytelling Poses. 2. Anticipation and Overshoots 3. Holds 4. Breakdowns 5. Contact poses

Warning: this is not a professional pitcher throw.
-Storytelling Poses: They’re the poses that you can verbalize the simplest, easiest and shortest. Say you’re animating a character pointing at something. 1. Stood still. 2. Pointed at X. You will consider the fully extended arm a Storytelling Pose. The arm down, is also a Storytelling pose. This is the mistake beginner animators most commonly do. Doing the end pose and not key the beginning pose for all the body parts. Then wonder why the character seems to start moving very slowly in some parts instead of moving at the moment they want to. 2D animators don’t have this problem, because they have to draw both poses in order for them to exist, in the 3D software, the pose might be there, but it’s not necessarily saved. but hey, I’m getting ahead of myself, first we have to observe.
-Turnaround poses: Anticipation and Overshoot: So what about all those frames in the middle? How do I tell which one to pick for my anticipations, overshoots, and so on? Ok, here are the tips: Anticipations and overshoots are also called: turnaround poses. Like the name implies, they turn around. They go from that up/back to to that up/forward in a throw, for example. They are in the middle of two Storytelling poses and the anticipation is usually close to the first Storytelling Pose and the overshoot close to the last, in theory. To look for that change in direction, here’s the tip: it’s usually a frame that’s in the middle of two frames with motion blurs in different angles, and has very little motion blur. You might also ask: well what about a movement that is a series of continuous poses? In that case, the overshoot is also working as the anticipation of the next movement. That’s why some animators prefer just calling them just one term: turnaround poses. Another tip to find them: they’re usually poses that are either squashed/stretched or very suitable for squashing/stretching. The line of action may be very obviously noticeable here. Speaking of obvious: this is where you should keep most in mind exaggeration.
-Holds and Moving Holds: That’s what they do, they hold a pose for a few seconds. Finding holds is also a good way to find your Storytelling Poses. Not all Storytelling Poses have Holds, but all holds come from a Storytelling Pose. You, as an actor and as a living being, never actually stop moving. The moment this happens, you’re not alive, you’re a statue. Same as holds. You could make a hold where somebody stays still, but if the character is supposed to be alive, you need to move that hold very slightly. You want you make your character look alive, but not floating in space. The rule of thumb is to have a very polished keyframe at least every 4 frames, after 6 the floatiness becomes very noticeable, so if a hold is too long, you might consider looking for changes in the balance of your actor, that may or may not be there, and use nuances like blinks, breathing or eye movement, which are involuntary, (yes, eye movement is involuntary, if you don’t believe me, record yourself looking at one spot for 5 seconds, if you manage to not move your eye, please call me a liar in the comments below) but that’s for later in the process of animation. Right now, just find the holds and the duration of each. You can get away with completely still holds in 2D and anime, but 3D believability is less forgiving, so you could say that in 3D, all Holds ARE Moving Holds. Usually after a hold, you’ll see a change in the eyes, like a blink or a change in direction of the eyes or hands and then the character speeds up into an action.
-Breakdowns: Finally, you’ll have a frame that 90% of the time, is at the very middle of two keyframes, not Storytelling Poses, keyframes, this means we’re considering anticipation, overshoots and holds to find the breakdowns as well, so finding breakdowns is a second phase, some animators call it Blocking-plus. This is the part of the movement where you’ll do two things: favor, and construct arcs. It’s not enough to just key it. There’s a saying in 3D animation that the computer is the dumbest inbetweener. If your breakdown is straight and right in the middle, you might as well just let the computer do it. Favoring is when you grab that breakdown and make it look more like the previous pose or the next pose, to slow or speed up things. Creating arcs is, well, creating arcs. These, you can mark them in your thumbnail sketches between keyframe and keyframe.
-Also, Contact Poses: a Storytelling Pose usually has Contacts, it usually it has the precise moment where a hand, or foot, is about to leave or arrive at the surface, but probably the other hand will not be as precise, and should not be. When a character has both hands and both feet doing every thing symmetrical and at the same time, we call this “tweening” and it’s another one of those no-no’s. So most Storytelling Poses have some sort of Contact, but not all contacts make a Storytelling Pose. These are tricky, they are that hand that was late to reach the table, and arrives 2 or 3, or 5 frames later, for example. Finding these avoids tweening in the movement. You don’t always have to key them, you can create the same thing with favoring during breakdown phase, but some times, you do need to key them because it’s very obvious and needs to reach the table entirely at that certain keyframe in order to make things feel sticky. But definitely add these to your thumbnails.
Anime can look choppy but you can follow the highly stylistic movement, mainly because these poses get covered, they’re not really drawn on 4’s, the best anime has 1’s, 2’s, and 4’s in the right places, and they consist of Story Poses, very exaggerated anticipations, overshoots and well placed breakdowns.
Thumbnailing:
It’s a fancy name for “drawing really really small”. Why? It forces you to not go into details you don’t need, and therefore keeping it fast, rough and to the point. How big? You guessed it, the size of a thumb.
“Give me 6 hours to chop down a tree, and I will spend the first 4 doing thumbnails”
You could do two types of thumbnails:
Storyboard thumbnails: This is grabbing your shot and making sure, in your mind, that it works. You can also do it in a 2D software. At this moment, you can call this “layout”, so you could choose doing one or the other. This type helps, because you’re also including the camera angle on your drawing, therefore, your staging is already correct.
Body thumbnails:
This phase is unavoidable, necessary and unforgivable to not do. This is where you turbo-charge your animation speed. Let’s say you have 2 weeks to animate a shot. Spend 1 day performing and editing your shot and 1 day thumbnailing the poses of your character. You’ll have everything here: Storytelling poses, anticipations, overshoots, holds, breakdowns, contact poses, you can draw arcs, mark blinks, if the character takes a breath, and everything marked with the number of the frame where it happens (this is extremely important, don’t forget to write down the frame number). There, timing problem solved for ever, or at least for most cases. You’ll also mark what syllable the line your characters says. The syllables that are loudest, sharpest and more articulate, are called accents, which, not always, but 80% of the time, is where your Storytelling Poses are. You’re welcome.

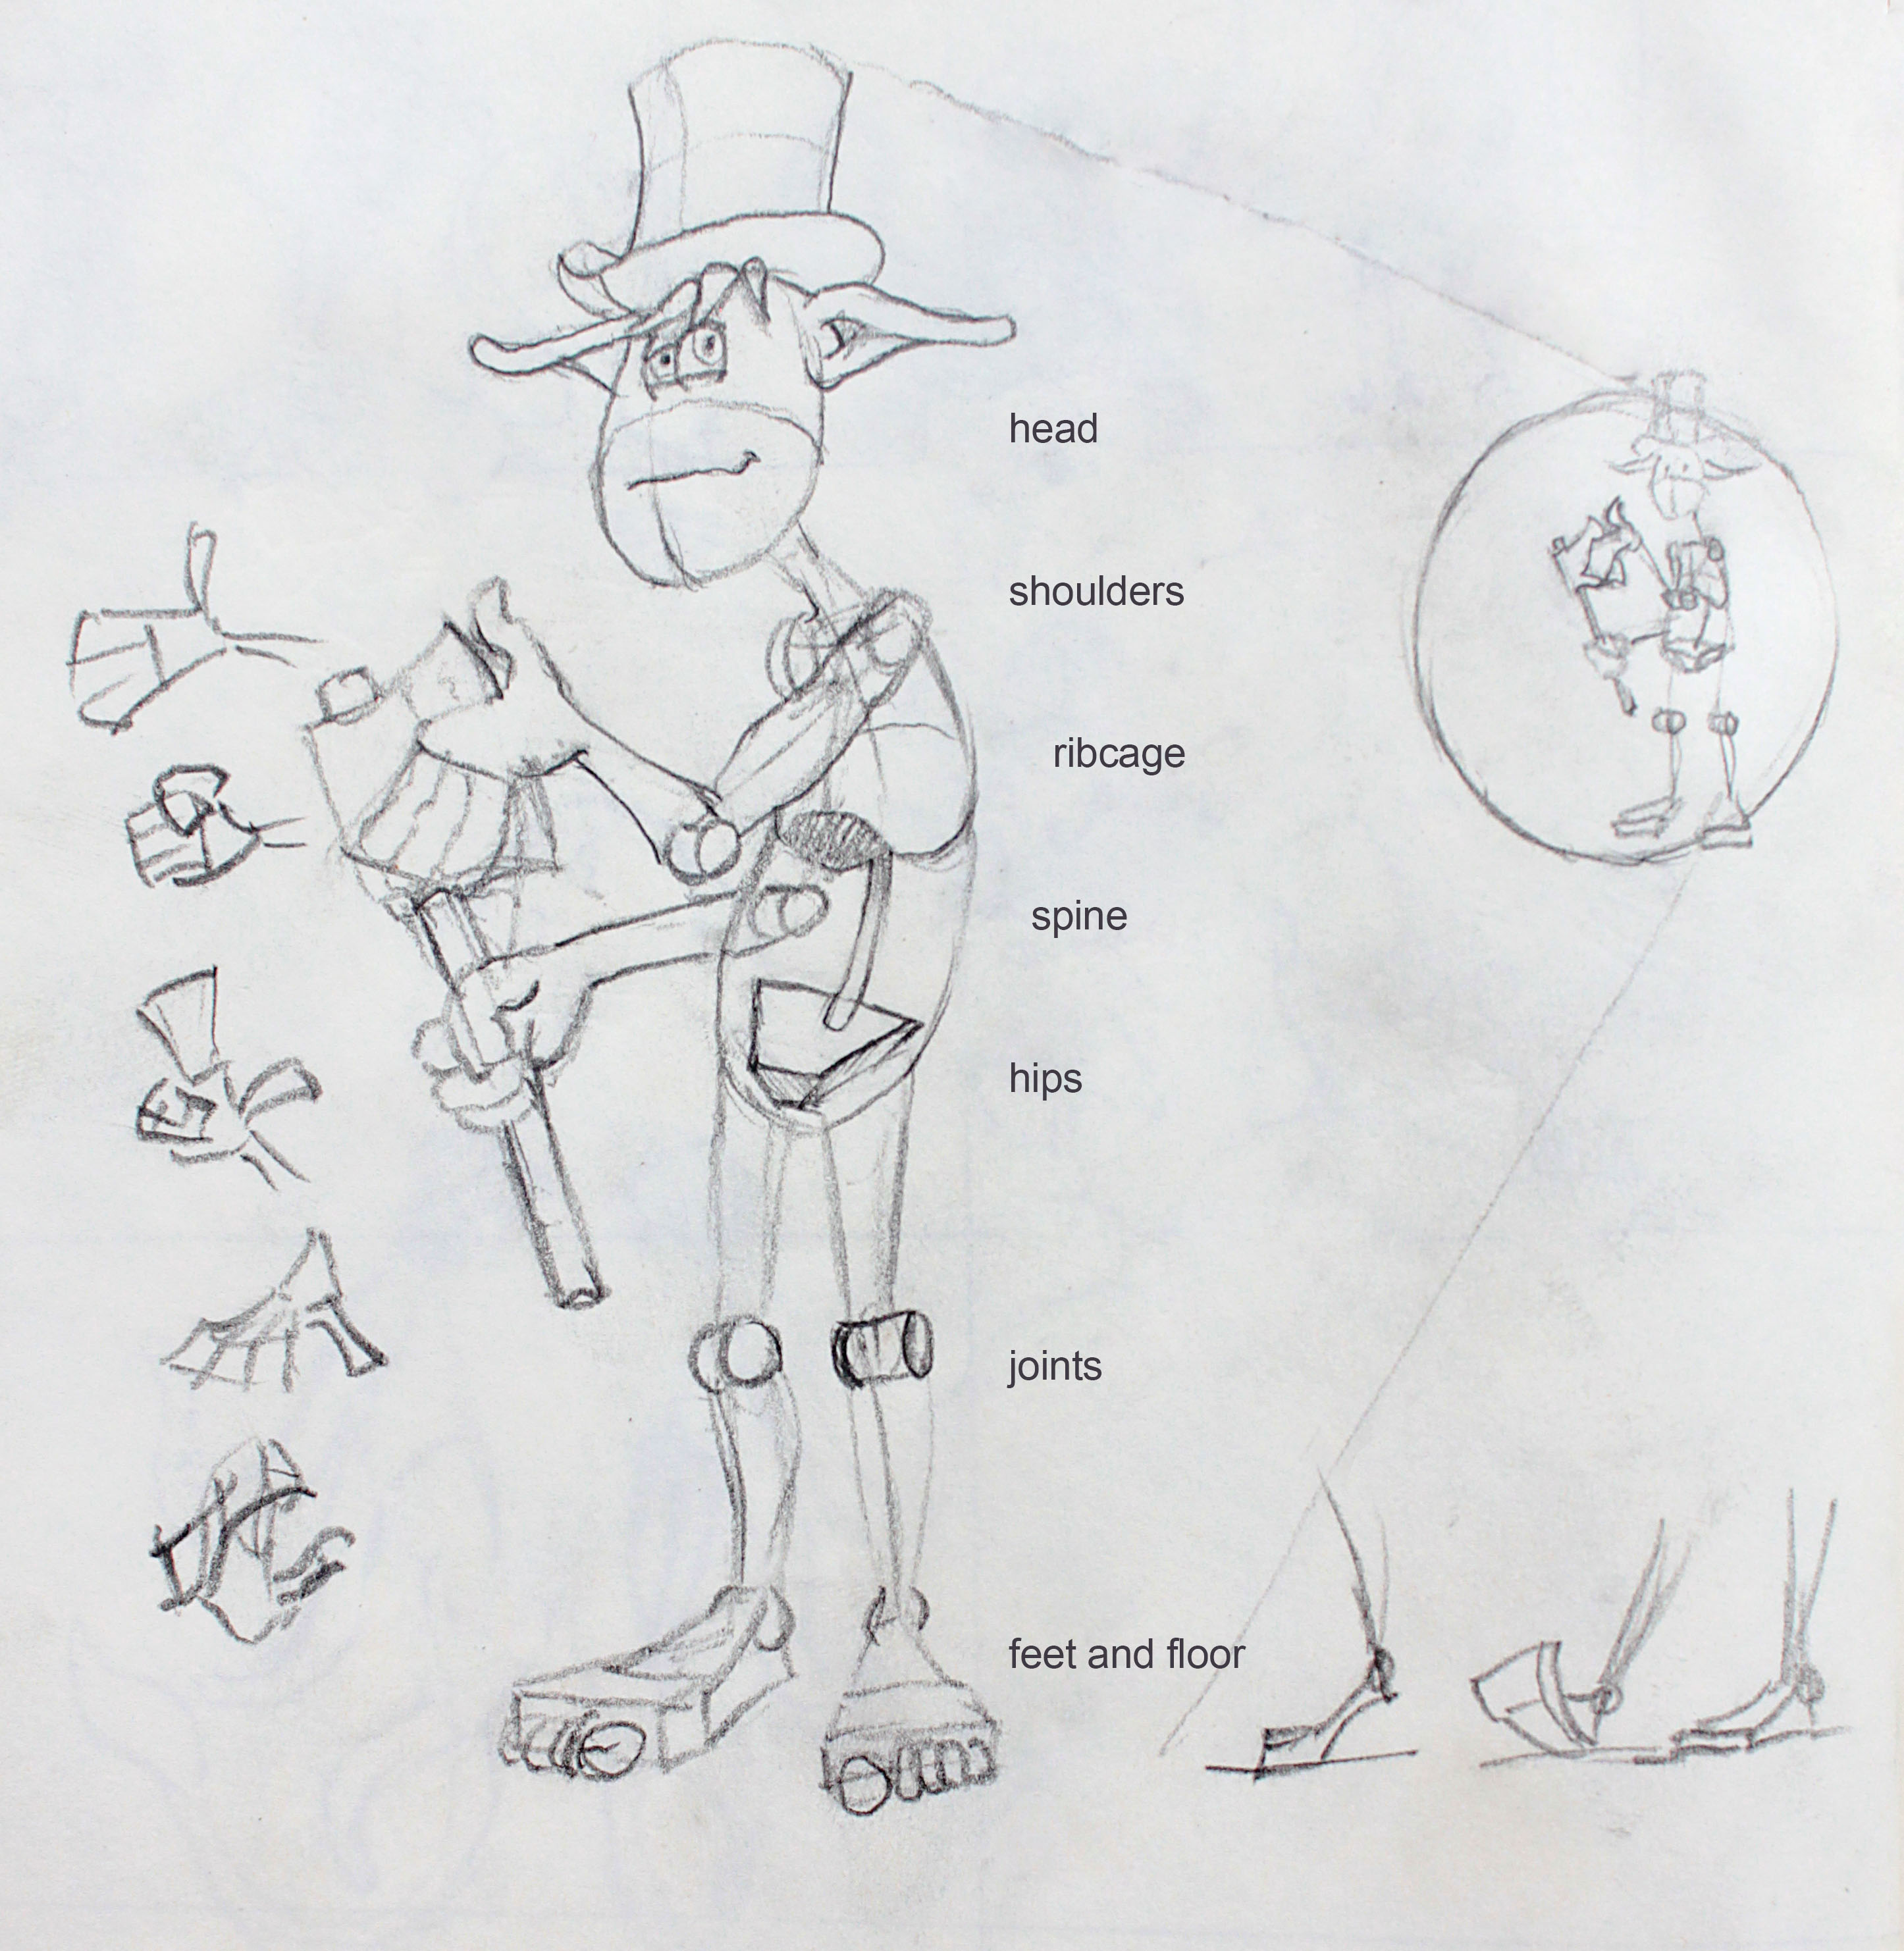
“what is THAT?” Using 2 Storytelling poses, putting the accent on “THAT”.
In these thumbnails, having the direction of the body part show up clearly, pays off in the appeal of your poses, so use geometric shapes to identify the angle in which the joints are pointing. For knees and elbows I use cylinders. For the head, I use a circle with it’s cross, with its center at the nose. I know Azulio doesn’t have one, but bear with me. Hands can be drawn as a fan for the most part. Marking the feet and putting a line to mark its relationship to the floor is very helpful too. Have a clear ribcage, spine (therefore, line of action) and pelvis. Using cubes also works.
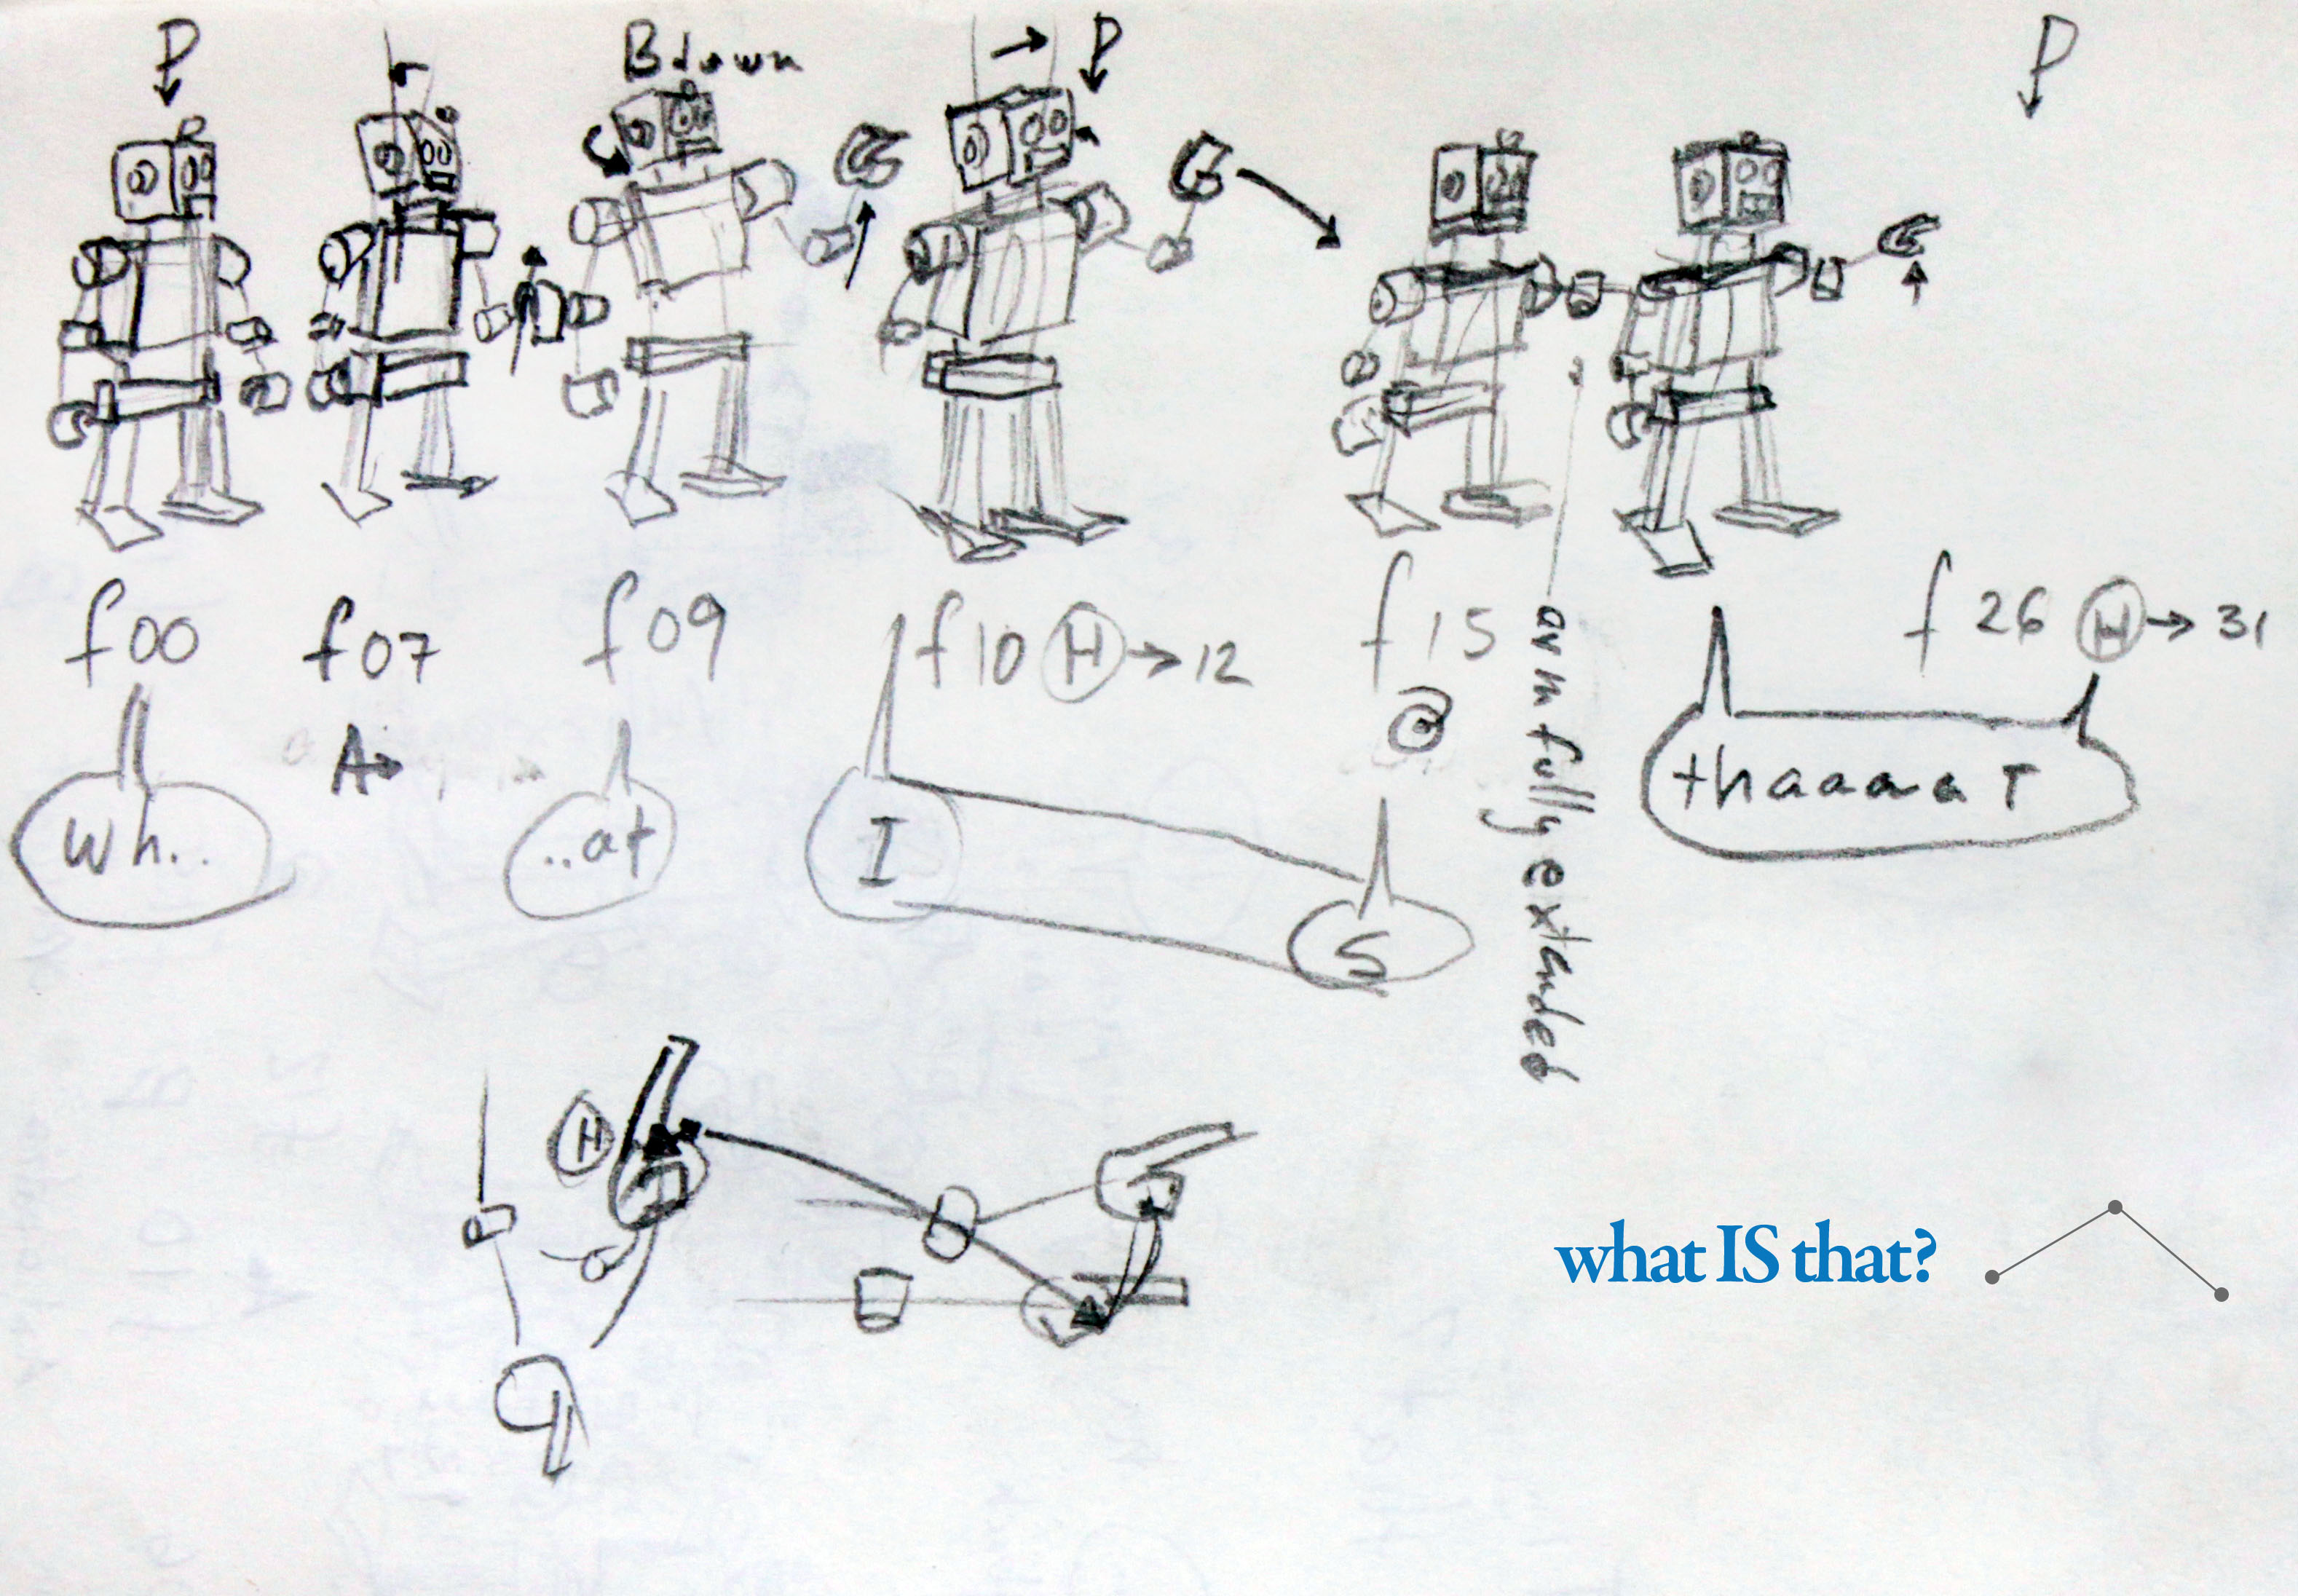
“what IS that?” Has 3 Storytelling poses, putting the accent on “IS”.
You can also do it from video to 2D software. Having the notebook between the keyboard and you, checking your clip periodically can be more than enough, if you grabbed every single nuance on paper. If you’re doing it digitally, do the same thing you did on paper, but do it as a drawing layer above your reference, on the frame. Here, you can draw over the arcs, as if connecting the dots of your shot and recreating what you did in your reference footage. You can choose to simplify your arcs by not adding small jiggles to them and beautify them by widening and spreading those elipses out from your shot. You’ll be basically pre-animating on 2D. You then grab your sequence and put the drawings as a background image behind or in front with 40% opacity behind or in front of your 3D camera. Sometimes, depending on how elaborate the shot is, this could be crucial. You’ll find that shots with a lot of camera movement, makes this technique very helful. This is where knowing 2D animation really pays off on 3D. You’ll know how and where in your timeline to pose everything. Once again, you get rid of the doubt and having to get up to act things out, when what you really should be doing, is animating.
Things to avoid:
Making everything epic:
If you build a tree house, you know that you have certain supports that are the base to others. You have those first, and make them as strong as you can. If you consider every turnaround pose, every blink and intake of air of your character as a main pose, you’ll end up with something that lacks texture and you’ll probably have wrists and hips twisting in an odd direction. Look for your path of action AND use your strongest poses to emphasize your path of action, by making clear lines of action from a pose to the next. Remember I told you about accents? Choose which accents will become key poses and which ones won’t and you’ll have texture. Time-wise and space-wise.
Too much WOW equals MEH
IF ALL YOUR POSES ARE ALL SUPER EXTREME, there will also be no texture at all. INStead you CHOOSE which poses to EMphasize, and you’ll give it FLAvor. Imagine a graph of your learning curve in animation: you learned a lot at first and did an excellent job with a gig, then you didn’t do animation for a month, then you had several projects where you did a lot of work, but you didn’t learn anything, then somebody came and told you: “dude, your quality has deteriorated” and that hurt you inmensely so you went online and looked for the animation principles and learned a ton. There’s a lot of ups, downs, semi-downs, super ups, and brief flatlining. That’s texture.
Not: Shock!, sad, boom!, zen, wild!, serious, OMG!, whatevs, LOL!, meh.
You’ll start noticing something interesting here: Sound and video complement each other. A sound that has a visual representation on the screen, sounds louder and gets noticed more than a sound that has no visual representation at all. So you’ll start modifying how the audience percieves the scene, by puting your Keys in the right accents. This is called the McGurk Effect, a sound, influenced by the visual cue, may be interpreted differently. You’ll be doing this to your whole performance, and you’ll be able to help it or distort it at will.

Going on autopilot:
Keep evaluating your shot. Planning goes all the way into your polish pass, but it’s more critical in your blocking. If, after a while, you’re going on autopilot and you’re just grabbing every pose, anticiaption, overshoot or breakdown and taking it literally from your reference, you either do not like your acting or you don’t really like your line. Either way, you should go back to the start. It also may mean that you haven’t slept. Sleep and start the next day with fresh eyes.
So what’s next for planning?
After Blocking-plus and Splining:
When you spline and start seeing those curvy, not so curvy arcs and probably those gimbal locks that come from extreme rotation of the wrists that you didn’t know where there, your planning is still in effect and still useful. All those marks where you said: “blink”, “breathes in”, “shoulders down from F045 to F057”, “hand contact” two frames later and all those drawings of arcs in the head, hips and hands, will make sense.
So you see, planning is a task that encompasses the whole animation process and without it, things get washed out and take ages to do. From the moment you know how to plan, whatever thing that took you a month to do before, you’ll get to do it in 2 weeks, what’s going to happen is that you’ll avoid a lot of moments where you thought you were polishing, but in reality, you were correcting flaws and testing in your playblast if the times are right. You’ll also end up getting do details you didn’t have time to do before, so you’ll do everything plus the details in the same month, but infinite times better and with much less frustration. I leave you with a quote from Greg LeMond, on cycling.
“It never gets easier, you just go faster.”
La planificación debe ser un principio animación. Ya, lo dije.
Una cosa que me ha duplicado mi capacidad de producción de animación y ha llevado a mis actuaciones fuera de la duda y le inyecta diversión a toda la mezcla, ha sido aprender cómo hacer la planificación adecuada. Digo que debe ser un principio de la animación, porque es la fase de la animación, donde se asegura de que se están aplicando todos los demás principios.
Entonces, ¿qué implica la planificación?
Siempre implica referencia y thumbnailing. También puedes incluír un X-sheet, el cual puedes incluír como una hoja de Excel, o simplemente apuntar el número del cuadro, debajo de la pose en tus thumbnails.
Referencia: vídeo, con o sin audio, dependiendo de tu toma. Puede (y suele) ser la filmación de tí mismo, la grabación de un amigo o simplemente encontrar ese clip del elefante coqueto que se da un baño que viste en youtube, porque, por desgracia, no tienes elefantes en tu casa o tu zoológico local. Trabaja con lo que tienes. He aquí una buena página web con toneladas de vídeos de animales:
http://www.arkive.org/
También, para la mecánica del cuerpo, simplemente haz un google de parkour. Vas o a encontrar buen material para animar o te vas a quedar viendo los videos. De nada / lo siento.
Si se trata de actuar: usa tu cámara o teléfono celular y graba un clip largo en el que hagas cerca de 10 actuaciones que haces siguiendo tu clip de audio. Para mí, funciona mejor si dices tus líneas en voz alta. El lenguaje corporal cambia significativamente si se fuerza para tomar aire y decir líneas en lugar de simplemente mover los labios.
Cuando tengas el vídeo grabado y en tu computadora:
Editar: escoger tu mejor actuación de las mejores. Esa en la que parpadeaste en el momento adecuado, en el que reaccionaste en el momento justo, en el que hiciste ese gesto cool con la mano y diste un paso adelante en ese claro arco y tu cuerpo parecía comprimirse y luego extenderse. ¿Ves? que ya estás aplicando los principios. Cuando tienes un buen desempeño, ya tienes la mayor parte del tiempo y el espaciamiento hechos, podrás ajustar el tiempo cuando estás en tu fase de blocking y cambiar un poco más cuando ya tengas todo en splines, pero en el espaciamiento es donde el cerebro del entrenado, hábil y creativo animador entra en acción, pero eso es en la etapa de thumbnails.
Toma de cuerpo completo
Dependiendo de cómo te filmas a tí mismo, tus personajes van a cambiar los ángulos, así que es mejor si lo haces todo de acuerdo con el ángulo de cámara que vas a usar. Así que este es el el mejor momento para decidir tu ángulo de la cámara y pegarte a él, el segundo mejor momento es cuando estás ya haciendo los thumnbnails, porque cabe la posibilidad de que decidas volver a esta fase. Después de eso, cada gran cambio que hagas a tu ángulo de la cámara, será alejarse de tu planificación. Tu dibujo debe centrarse en tu lenguaje corporal, así que si su toma es una toma close-up, donde solo salga de la cintura para arriba, tu filmación de todo el cuerpo, podría no ser tan útil. Un encuadre que muestre las caderas, en este caso, es más que bien, y las miniaturas también. Pero ten en cuenta mucho la cadera, para el balance de tu personaje. Una toma que es más de cuerpo completo, requerirá mostrar los pies, de esa manera no tienes que adivinar donde el pie se levanta del piso o comienza a girar con el fin de sentarse en esa silla que está en un ángulo, por ejemplo.
Es posible que tengas las mejores partes de la actuación realizada en la toma 2, pero probablemente para el final, te salió mejor el intento #7, por lo que debes tomar las dos tomas hacerlas encajar en la pose en que se parezcan más. Asegúrate que no estás alargando o disminuyendo el clip de audio. Mantén las cosas en el timeline, sólo para hacer la transferencia de la actuación de un intento al siguiente, con la mayor fluidez posible.
Advertencia: este no es un lanzamiento de pitcher profesional.
Observa:
Si abres en Quicktime, puedes ir al timeline y verlo por tiempo o por número de cuadro. Así es, ponlo por número de cuadro y listo. Compruebe para estos tipos de keyfames: 1. Storytelling Pose (en español: pose de cuentacuentos?) 2. Turnaround poses (poses de cambio de dirección?): Anticipación y overshoots (excederse? rebasarse?) 4. Breakdowns (romper abajo? avería?) 5. Holds (pose mantenida) 6. Contact Poses (poses de contacto). Mejor vamos con los términos en inglés, son más cortos y admitámoslo, esto lo inventaron los 9 viejitos.
Storytelling Poses: Son las poses que pueden verbalizarse más cortamente y son más obvias. Digamos que deseas animar un personaje que apunta hacia algo. 1. Estaba parado 2. Apuntó hacia X. Sabes que la pose con el brazo totalmente extendido es un Storytelling Pose. El brazo abajo, es también un Storytelling Pose. Este es el error animadores principiantes más comúnmente hacen. Hacer el 2do keyframe muy bien, pero no ponen los keys para todas las partes del cuerpo en la primera pose. Luego se preguntan por qué el personaje parece comenzar a moverse muy lentamente en algunas partes y no se empiezan a mover en el momento que quieren. La razón porque a los animadores 2D no les pasa, es porque a ellos les toca dibujar cada pose para que existan. En 3D, la pose puede estar ahí, pero no necesariamente está salvada. Pero bueno, me estoy adelantando, primero tenemos que observar.
Turnaround Poses: Anticipación y Overshoot: Entonces, ¿qué pasa con todos los cuadros en el medio? ¿Cómo puedo saber cuál elegir para mis anticipaciones, overshoots, y así sucesivamente? Ok, aquí hay un par de trucos: anticipaciones y overshoots también se les conoce como: turnaround poses. Como el nombre lo indica, se dan la vuelta. Van desde arriba/atrás hacia arriba/adelante y hay un cambio en la dirección. Están en el medio de dos Storytelling Pose y la anticipación es generalmente cerca de la primera Storytelling pose y el rebasamiento cerca de la última, en teoría. Para buscar ese cambio en la dirección, aquí está el consejo: por lo general es un cuadro que está entre dos cuadros con diferentes ángulos y no tiene casi motion blur. Te preguntarás: ¿qué pasa así el movimiento es una serie de poses continuas? En ese caso, el overshoot también está trabajando como la anticipación del próximo movimiento. Es por eso que algunos animadores prefieren simplemente llamarlos como una misma cosa: Turnaround. Otro consejo para encontrarlos: por lo general se supone que son ya están squashed/stretched o están casi adecuados para aplastar o estirar. La línea de acción también puede ser muy obvia en estos cuadros. Hablando de obvio, estos son los cuadros donde se más debes tener en cuenta la exageración.
Holds y Moving Holds: Eso es lo que hacen, mantienen una postura durante unos segundos. Encontrar holds también es una buena manera de encontrar tus Storytelling Poses. No todos los Storytelling Poses tienen Holds, pero todos los Holds provienen de un Storytelling Pose. Tú, como actor/actriz y como un ser vivo, en realidad nunca dejas de moverte. En el momento en que esto sucede, no estás vivo, eres una estatua. Igual que los Holds. Podrías hacer un Hold donde alguien se queda quieto, pero si el personaje se supone que está vivo, es necesario mover los Holds un poco. Deseas hacer que tu personaje se vea con vida, pero que no flote en el espacio. La regla de oro es que tengas un keyframe bien pulido manualmente en un intervalo de máximo 4 cuadros, después de 6 cuadros sin hacer un keyframe, la flotadera se vuelve notable, por lo que si un Hold es demasiado largo, es posible considerar la búsqueda de cambios en el equilibrio de tu actor, que pueden o no estar allí, y utilizar sutilezas como parpadeos, la respiración o el movimiento del ojo, que son involuntarias, (sí, el movimiento del ojo es involuntario, si no me crees, grabarte mirando a un punto durante 5 segundos, si te las arreglas para no mover el ojo, por favor llámame mentiroso en los comentarios), pero eso es para más adelante en el proceso de animación. Primero es encontrarlos y encontrar su duración. Puedes salirte la tuya por completo en 2D y el anime, pero la credibilidad 3D es menos indulgente, así que se podría decir que en 3D, todos los Holds son móviles. Usualmente después de un Hold, hay un cambio en la mirada, un parpadeo o cambio de dirección en los ojos o manos y luego un aceleramiento para entrar en la siguiente acción.
Breakdowns: Por último, tendrás un cuadro que el 90% de las veces, está en el medio de dos keyframes, ojo, dije Keyframes, no Storytellin Poses, esto significa que estamos teniendo en cuenta los cuadros de Anticipación, de Overshoots y Holds para encontrar los Breakdowns, por lo tanto, Breakdowns es una siguiente fase, algunos animadores le llaman a esto el Blocking-Plus. Breakdowns es la parte del movimiento, donde puedes hacer dos cosas: favorecer, y empezar a construír arcos. No es suficiente con sólo darle Key al cuadro. Se dice que en 3D, el ordenador es el inbetweener más tonto del mundo. Tu Breakdown es recto y justo en el medio, mejor deja que la computadora lo haga por tí, no? Por lo tanto, los breakdowns se trabajan también. Favorecer es cuando tomas el Breakdown y haces que se vea más como la pose anterior o la siguiente, para acelerar o frenar movimientos. Creación de arcos es, así mísmo, la creación de arcos. Estos, puedes marcarlos en tus bocetos de Thumbnails entre Keyframe y Keyframe.
También, Contact Poses: un Storytelling Pose, por lo general tiene el momento preciso donde la mano, o el pie, está a punto de dejar la superficie o justo la llegada, pero la otra mano no va a ser igual de precisa, y no debe serlo. Cuando un personaje tiene las dos manos y los dos pies haciendo cada cosa simétricamente y simultáneamente, se le llama “tweening” y es otro de esos casos que son papau. Así que casi todos los Storytelling Pose tienen algún Contacto, pero no todos los Contactos hacen un Storytelling Pose. Estos son difíciles, son cuando la mano está un poco tarde para llegar a la mesa, y llega 2, o 3, o 5 cuadros más tarde, por ejemplo. La búsqueda de estos evita el tweening en el movimiento. No siempre tiene que teclear ellos, puede crear la misma cosa con favoreciendo durante la fase de descomposición, pero algunas veces, usted tiene que teclear ellos porque es muy obvio y tiene que llegar a la mesa por completo en ese determinado fotograma clave con el fin de hacen que las cosas se sientan que se adhieren a las superficies. Pero definitivamente añádelos a tus thumbnails.
El Anime se podrá ver entrecortado pero el movimiento altamente estilízado se puede seguir, principalmente porque estas posturas se cubren, no están realmente hechos en 4’s, el mejor Anime usa 1’s de 2’s y 4’s de en los lugares adecuados, y consisten en Storytelling Poses, Anticipaciones, Overshoots, Holds y breakdowns bien colocados.
Thumbnailing:
Es un nombre lujoso para “dibujo muy, muy pequeño”. ¿Por qué? Te obliga a no entrar en detalles que no son necesarios, y por lo tanto mantienes todo rápido, suelto y al grano. ¿Qué tan grande? Thumb = pulgar. Nail = uña. Pero no lo haría del tamaño una uña, no sé por qué le incluyen la uña. Una pulgada es perfecta.
Puedes hacer dos tipos de Thumbnailing:
Storyboard Thumbnails: Esto es agarrar tu toma y asegurarte en tu mente, que funciona. También puedes hacerlo en un software 2D, en este momento, puedes llamar a esto algo más que un “layout” y llevarlo a una versión más elaborada de tu Animatic. Puedes hacerlo de cualquiera de las dos maneras. En este tipo de Thumbnail , ya también está incluido el ángulo de la cámara en su dibujo, por lo tanto, el staging de los personajes es ya correcta.
Thumbnails Corporales:
Esta fase es inevitable, necesaria e imperdonable no hacerla. Aquí es donde puede turbo-cargar la velocidad de tu animación. Digamos que tienes 2 semanas para animar una toma. Pasa 1 día filmando y editando tu toma y 1 día haciendo los thumbnails de las poses de tu personaje. Tendrás todo aquí: Storytelling Poses, Anticipaciones, Overshoots, Holds, Breakdowns, Contact Poses, puedes dibujar arcos, marcar los parpadeos, si el personaje toma un respiro, y todo marcado con el número cuadro de cuando ocurre (esto es sumamente importante, no se olvide de anotar el número de cuadro). Allí tienes tu problema de tiempo resuelto para siempre, o por lo menos para la mayoría de los casos. También marca la sílaba de la línea que tus personajes dicen. Las sílabas que son más fuertes, más nítidas y más articuladas, se llaman acentos, que no siempre, pero el 80% de las veces, es donde sus Storytelling Poses están. De nada.
“what is THAT” con 2 Storytelling Poses, poniendo el acento en “THAT”.
“what IS that” Teniento 3 Storytelling Poses, poniendo el acento en “IS”
En estos Thumbnails, el tener la dirección de la parte del cuerpo clara, ayuda mucho en el atractivo de tus poses, así que usa formas geométricas para identificar el ángulo en el que las articulaciones están apuntando. Para las rodillas y los codos utilizo cilindros. Para la cabeza, uso un círculo y una cruz que lo envuelve, con su centro en la nariz. Sé que Azulio no tiene nariz, pero tenme paciencia. Las manos se pueden dibujar como un abanico en la mayoría de las ocasiones. Marcar los pies y poner una línea para marcar su relación con el suelo es muy útil también. Tener una caja torácica clara, la columna vertebral (por lo tanto, la línea de acción) y la pelvis. También puedes usar cubos para esto.
También puedes hacerlo desde el vídeo al software 2D. Tener el cuaderno entre el teclado y que, revisando periódicamente su clip puede ser más que suficiente, si capturaste cada detalle en el papel. Si lo estás haciendo digitalmente, hazlo mismo que harías en el papel, hazlo como una capa de dibujo por encima de su referencia. Aquí, puedes dibujar sobre los arcos, como si conectaras puntos usando cada cuadro y recrear lo que hiciste en tu referencia. Puedes aquí, elegir simplificar tus arcos al no añadir los más pequeños sub-movimientos y embellecer los arcos ampliandolos y esparciendo esas elipses hacia fuera de tu toma. Estarás básicamente pre-animando en 2D. Luego tomas la secuencia de imágenes y la pones detrás o delante de tu toma, con un 40% de opacidad sobre el encuadre 3D. A veces, dependiendo de cuan elaborada es la toma, esto podría ser crucial. Las tomas con una gran cantidad de movimiento de la cámara, hacen esta técnica muy útil. Aquí es donde conocer la animación 2D realmente vale mucho la pena en 3D. Sabrás cómo y dónde en el timeline poner todo. Una vez más, te desharás de la duda y de tener que levantarte a actuar las cosas, cuando deberías estar haciendo es animando.
Cosas que deben evitarse.
Hacer todo épico:
Si construyes una casa en un árbol, sabes que debes tener ciertos apoyos que son la base para los demás. Tienes los primeros y los haces tan fuertes como puedas. Si tienes cada giro de cada pose, cada parpadeo y la ingesta de aire de tu personaje como una pose principal, podrás terminar con algo que carece detextura y es probable que las muñecas y las caderas queden torcidas en en direcciones extrañas. Busca Path of Action, , haciendo muy claras tu línea de acción en cada pose a la siguiente. ¿Recuerdas que te hablé de acentos? Elige qué acentos serán las Storytelling Poses, cuáles no y así tendrás textura en sentido de tiempo y en sentido de espacio.
SI TODAS TUS POSES SON SUPER EXTREMAS, no habrá textura en lo absoluto. Recuerda lo que dijo el pequeño Increíble: “si todos son especiales, entonces nadie lo es” En VEZ, esCOge qué POses acenturar, para DARle, saBOR. Imagina un gráfico de tu curva de aprendizaje en la animación: aprendiste mucho al principio e hiciste un excelente trabajo con un proyecto, te sentiste el rey del universo, luego no animaste por un mes, entonces tuviste varios proyectos en los que hiciste un montón de trabajo, pero que no aprendiste nada, porque pensabas que lo sabías todo, entonces un amigo se te acercó y te dijo: “tu calidad se ha deteriorado”, y quedas dolido inmensamente, por lo cual, te mestiste en el internet y leíste sobre los principios de animación y aprendiste un montón. Hay una gran cantidad de subidas, bajadas, semi-bajas, super-subidas, y breves partes planas. Esto es textura.
No hagas esto: Mucho WOW resulta en un MEH.
No: Shock!, triste, boom!, zen, salvaje!, serio, santo cielo!, lo que sea, jajaja!, meh.
Vas a empezar a notar algo interesante aquí: Sonido y video se complementan entre sí. Un sonido que tiene una representación visual en la pantalla, suena más fuerte y se nota más que un sonido que no tiene ninguna representación visual en absoluto. Así que comenzarás a modificar la forma en la audiencia percibe la escena, por que pones las poses en los acentos correctos. Esto se llama el Efecto McGurk, un sonido, influido por la señal visual, puede ser interpretado de manera diferente. Vas a hacer esto a toda tu actuación, serás capaz de reforzarlo o distorsionarlo a voluntad.
Haz algo como esto y juega con el el efecto McGurk.
Ir en piloto automático:
Mantente evaluando tu toma. Planificación se aplica todo el trayecto hasta la etapa de pulir, pero es más crítico en blocking. Si, después de un tiempo, vas en piloto automático y sólo estás tomando cada pose, anticiaption, rebase o avería y tomas todo literalmente de su referencia, o bien no te gusta la actuación o que no te gustan tu líneas. De cualquier manera, hay que ir de nuevo al comienzo. También puede significar que no has dormido. Descansa y empezieza el día siguiente con ojos frescos.
Entonces, ¿qué sigue para el planning?
Después de blocking-plus y splining:
Cuando le das spline a todo y comienzas a ver los arcos tan sinuosos y no tan sinuosos y probablemente un par de gimbal locks que vienen de rotación extrema de las muñecas que no sabías que estaban ahí, la planificación sigue en vigor y todavía es útil. Todas las marcas en la que pusiste: “los hombros hacia abajo de F045 a F057” “parpadea”, “respira en”, “contacto de las manos” dos cuadros más tarde y todos esos dibujos de arcos en la cabeza, las caderas y las manos, tendrán sentido y te guiarán.
Así que ya ves, la planificación es una tarea que abarca todo el proceso de animación y sin ella, las cosas se aguan y tomarían largos ratos en hacerse. Desde el momento en que sabes cómo planificar, cualquiera cosa que te tomó un mes para hacer antes, podrás hacerlo en 2 semanas, lo que va a suceder es que evitarás un montón de momentos en los que pensabas que estabas puliendo, pero en realidad, estabas corrigiendo defectos y probando en tu playblast, si el tiempo está bien. También vas a llegar a conseguir que puedes poner detalles para los que antes no tenías tiempo, por lo que vas a hacer todo más los detalles en el mismo mes, pero infinitas veces mejor y con mucho menos frustración. Te dejo con una cita de Greg LeMond, sobre el ciclismo.
“Nunca es fácil, solo vas más rápido.”
Tags: 3D animation, animation, anime, anticipation, blocking, blocking-plus, body mechanics, breakdowns, drawing, holds, keyframes, moving holds, overshoot, pitch, planning, reference, sketches, software, spacing, splining, storytelling poses, thumbnails, timing, turnaround poses

Comment